Aerial videography works best when it does more than look impressive: it gives scale, shows movement, and explains a place in a way ground footage cannot. In this article I break down what makes the shots work, which drone features actually matter, how to plan a shoot in the UK, and where the legal and privacy boundaries sit. I’m also focusing on the practical choices that separate usable footage from an expensive but forgettable clip.
Key information at a glance
- Strong drone footage is built around movement, context, and timing, not just altitude.
- For most UK camera drones, the legal basics include a Flyer ID, an Operator ID, and a 120m ceiling.
- If you are buying new hardware in 2026, UK class marks matter because they affect where you can legally fly.
- Manual exposure, ND filters, and a stable gimbal do more for quality than chasing the highest resolution.
- Privacy is not optional: if people can be identified, the footage may fall under UK data protection expectations.
What the viewer actually wants from drone footage
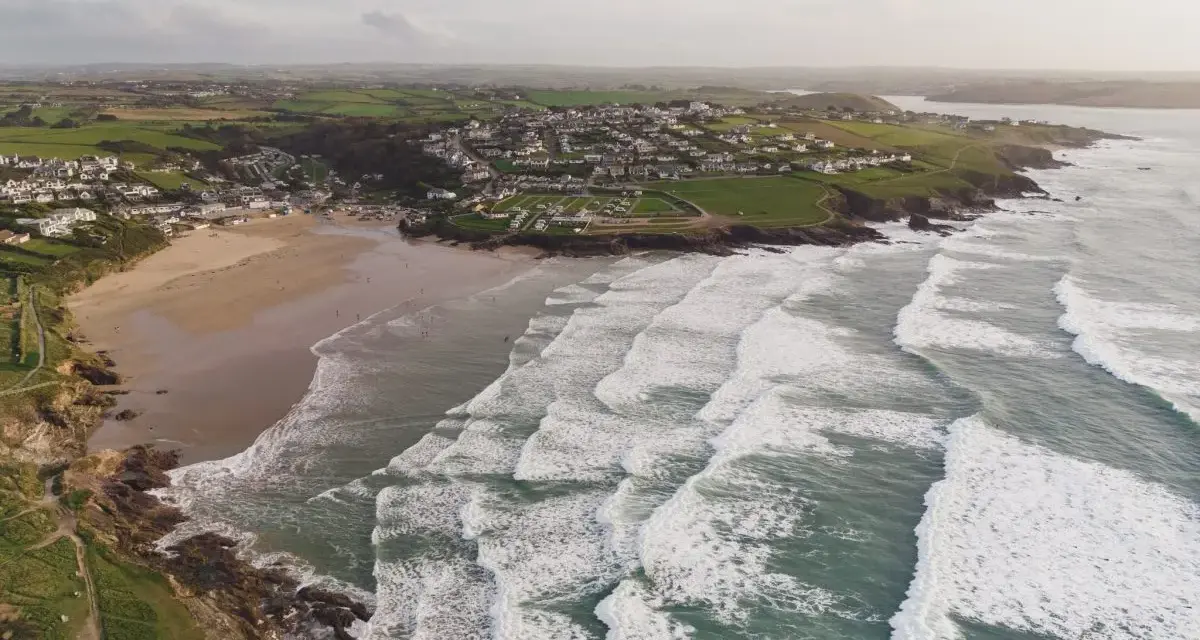
When a drone clip works, it answers a visual question immediately: where am I, how big is this, and why does it matter? That is why the best footage usually has a job to do, whether it is showing the scale of a coastline, making a property feel anchored in its surroundings, or giving a construction update enough context to be useful.
I think people often overvalue altitude and undervalue readability. A shot from 20 metres that clearly reveals shape, movement, and relationships can be far more effective than a higher, busier shot with no visual purpose. That is especially true for modern tech and infrastructure content, where the drone is less a novelty and more a way to show systems, sites, and connectivity from a perspective a handheld camera cannot reach.
Before you choose hardware or plan camera settings, decide what the shot is supposed to communicate. Once that purpose is clear, the next decision is the platform.
Choose the right drone and camera package
The gear choice should follow the job, not the other way around. For a quick brand clip or travel piece, a compact drone may be enough. For a polished commercial film, I want a steadier gimbal, manual exposure control, and a file that survives grading without falling apart. In 2026, that decision also has a legal dimension: the class mark now affects how a drone can be used in the UK.
| Drone type | Best for | Trade-offs | My take |
|---|---|---|---|
| Sub-250g compact drone | Travel, property, quick social edits, lighter compliance pressure | Usually less wind resistance, smaller sensors, and less room in low light | The easiest way to start if you want flexibility and decent image quality without carrying a larger system. |
| Light prosumer drone | Editorial work, commercial web video, most creator jobs | More rules to manage, more attention needed on planning and airspace | This is often the sweet spot: good image quality, better flight stability, and enough control to look intentional. |
| Professional platform | Cinema, specialist payloads, high-end branded content | Higher cost, more logistics, and fewer places where it makes sense to fly | Worth it only if the sensor, lens options, or payload genuinely change the final result. |
I care more about a clean 10-bit file, good dynamic range, and a reliable gimbal than about the biggest headline resolution. A gimbal is the stabilised mount that keeps the camera level while the aircraft moves, and it matters more than many beginners realise. As the CAA notes, any new model placed on the UK market from 1 January 2026 must have a UK class mark, so the label on the box is now part of the buying decision, not just a technical footnote.
Once the hardware matches the job, the next bottleneck is usually planning, because the best setup in the world still fails if the flight itself is improvised.
Plan the flight like a production
I treat drone work like a small shoot, not a casual spin in the air. That means checking the location at the same time of day you intend to film, looking at where the light falls, and deciding what the shot list actually needs before the aircraft leaves the case. In the UK, weather is often the real director: gusts, drizzle, and low cloud will end more shoots than creative indecision ever will.
The planning stage should cover a few concrete things:
- Confirm the exact location and identify any airspace restrictions.
- Check wind speed, gust forecast, and any changing light windows.
- Build a short shot list with only the moves you genuinely need.
- Carry enough batteries, memory cards, and a backup plan for a shorter flight window.
- Decide in advance what you will not film, especially near people, homes, or sensitive sites.
For me, the most overlooked part is timing. Coastal work needs tidal awareness, urban work needs traffic and crowd timing, and construction content often benefits from early morning when the site is active but not chaotic. Once the plan is tight, the aircraft should only be used to execute it.
Fly with movement, not just height
The shots people remember usually have a clear motion idea behind them. A reveal, orbit, lateral track, or slow pull-back gives the viewer a reason to keep watching because the camera is doing something deliberate, not just drifting.
| Shot type | Why it works | Common mistake |
|---|---|---|
| Reveal | Builds anticipation by exposing the subject gradually | Starting too high, so the reveal has no payoff |
| Orbit | Shows geometry and creates a sense of presence | Turning too fast and losing smoothness |
| Lateral track | Creates parallax and makes the scene feel dimensional | Changing altitude unintentionally while moving sideways |
| Top-down view | Useful for maps, layouts, and pattern-based scenes | Using it without a clear subject, so it becomes abstract noise |
| Pull-back | Ends a sequence with scale and context | Overusing speed ramps instead of letting the move breathe |
Camera settings matter just as much as movement. In the UK, 25 fps often feels natural for delivery, while 50 fps is useful if you want clean slow motion. I usually aim for a shutter speed around 1/50 at 25 fps or 1/100 at 50 fps, then use ND filters to hold exposure in daylight rather than letting the drone overcorrect with auto settings. Fixed white balance and low ISO also help keep the grade stable later.
The point is not to make the drone look busy. The point is to make the movement feel controlled, so the viewer focuses on the subject instead of the aircraft. From there, the edit becomes much easier.
Edit for clarity, not spectacle
Good drone editing is usually restrained. I would rather see three strong clips than twelve nearly identical passes. A clean sequence often starts wide, moves into a more specific angle, and ends with a shot that gives the viewer a sense of closure or scale.
A few habits make a noticeable difference:
- Cut out hesitation and keep only the part of the move that adds information.
- Use music and sound design to support pacing, not to hide weak visuals.
- Grade the footage consistently so sky, water, and surfaces do not feel disconnected from one another.
- Stabilise only when needed; if the flight is smooth, heavy post-stabilisation can make the image feel artificial.
- Export the master in a format that suits the final platform, then adapt for social versions if needed.
If the shoot is for web video, I usually think in layers: a wide establishing shot, a mid-distance movement shot, then a detail pass that gives the viewer a reason to care. That structure keeps the footage from feeling like random aerial postcards and turns it into something with editorial shape. The remaining issue is whether the shoot stays inside the legal and privacy boundaries that matter in the UK.
Stay legal and privacy-aware in the UK
The rules are straightforward enough that there is no good reason to ignore them. For most camera drones in the UK, you should expect to need the right registration before you fly outdoors, and the basic flight limits still matter: do not fly above 120m, do not fly over crowds, and keep the aircraft under control with direct sight at all times. If you fly commercially, third-party insurance is required.The privacy side is just as real. The ICO treats drone footage as a video-surveillance issue when it captures identifiable people or other personal data, so if you are filming on behalf of a business, think about privacy notices, signage, and retention habits before you think about colour grading. A drone hovering over a garden, window, or event crowd may be technically possible and still be a bad idea.
There is also a buying angle here. Smaller aircraft give you more flexibility, while heavier or more specialised platforms can narrow where you can legally and practically operate. That is why I would not choose a drone only on image quality. I would choose it on image quality plus where I can actually use it without creating compliance problems.
When those boundaries are clear, you can focus on the craft without second-guessing every take.
The habits that make drone work look intentional
If I had to reduce the whole process to a few habits, they would be these: know the shot’s purpose, move the aircraft slowly, expose manually, plan the location properly, and stay disciplined about privacy and airspace. Those five things do more for results than any shortcut or spec sheet.
- Pick one visual idea per clip.
- Fly lower and slower than your first instinct suggests.
- Use the drone as a camera platform, not as a stunt device.
- Leave enough battery margin to land calmly, not urgently.
- Respect the people and places in frame, even when the law does not force a dramatic change of plan.
If you are starting now, I would build around a compact drone with manual controls, practise three or four repeatable moves, and create a pre-flight checklist that covers weather, airspace, privacy, and battery reserve. That combination gives you cleaner footage, fewer surprises, and a workflow that still makes sense when the brief gets more demanding.