Drone photography and videography can give a project scale, context, and motion that a ground camera cannot match, but the aircraft is only half the job. I care just as much about airspace rules, camera settings, and shot planning as I do about the drone itself, because that is what turns a flyover into footage people can actually use. This guide focuses on the practical side in the UK: what to buy, what to check before takeoff, how to shoot cleaner frames, and how to avoid the mistakes that waste time or create legal risk.
What matters most before a drone flight in the UK
- Most camera drones need registration. In the UK, a Flyer ID and an Operator ID are common requirements, and the exact setup depends on weight and class.
- 2026 changes the market. New drones sold in the UK from 1 January 2026 must carry a UK class mark, and Remote ID is already part of the buying decision for some models.
- Stability beats gimmicks. A three-axis gimbal, decent wind resistance, and reliable transmission matter more than flashy automation.
- Paid work is a different category. If you are filming for a client, third-party insurance is required.
- Good footage starts before takeoff. The best shots usually come from a route, a subject, and a battery plan, not improvisation.
What aerial footage does better than ground cameras
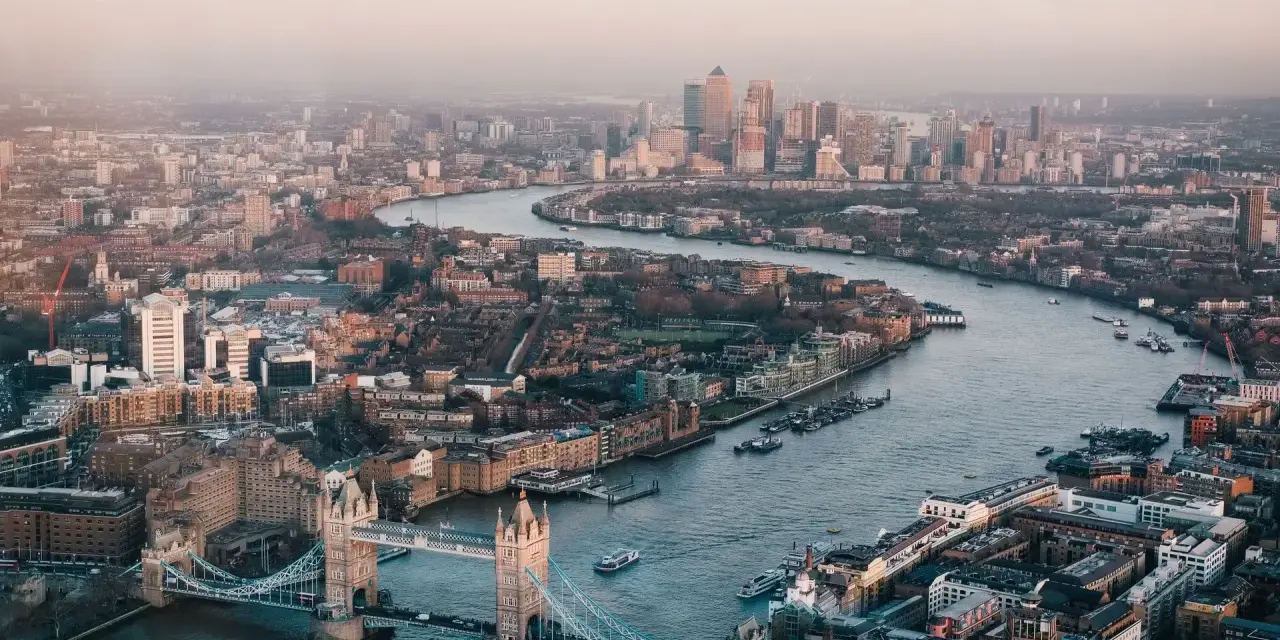
I think aerial work succeeds when it does one of three things: shows scale, separates a subject from its surroundings, or adds motion that makes a scene feel alive. A coastline, a building, a field pattern, or a moving vehicle often looks flat from the ground; from the air, the relationships become obvious.
That is also why drones are not a universal replacement for ground cameras. They are weak in cramped interiors, crowded event spaces, and situations where privacy matters more than spectacle. When I plan a shoot, I ask a simple question: does height add information, or am I just flying because I can? If the answer is not clear, the next section matters more than the camera model: choosing the right aircraft for the job.
Choosing the right drone for the job
I usually split camera drones into three practical groups, because that is easier than getting lost in product names.
| Drone type | Best for | Trade-offs | What I look for |
|---|---|---|---|
| Sub-250g travel drone | Travel clips, quick social content, light property coverage | Less wind stability and usually a smaller sensor | 4K capture, reliable gimbal, good return-to-home, quick setup |
| Mid-range camera drone | Freelance real estate, tourism, brand work, most commercial aerial jobs | More weight, more rules, and more cost | 1/1.3-inch to 1-inch sensor, manual exposure, solid obstacle sensing |
| Prosumer system | Broadcast, film, industrial inspections, advanced client work | Higher training, insurance, and operational overhead | Better dynamic range, stronger transmission, and more control over colour profiles |
Under 250g is useful for travel and simplicity, but it does not mean “no rules”. In the UK, a camera still changes the registration picture, and class marks now matter when you buy new hardware. For paid work, I also want roughly 25 minutes or more of usable flight time once I factor in a reserve to get back safely. Once the hardware decision is clear, the next step is the one that keeps the whole flight legal.
The UK rules I check before takeoff
For UK flights, the first thing I check is not the camera; it is the paperwork. Most camera drones in the UK need both a Flyer ID and an Operator ID, and the CAA’s current code says new models placed on the market from 1 January 2026 must carry a UK class mark. If you bought earlier, you can still fly it, but you need to follow the weight-based rules that apply to older aircraft. Most small aerial projects stay in the Open category, which is split into A1, A2, and A3; the real difference is how close you can get to people and how much training the job needs.
- Flyer ID if your drone meets the relevant weight threshold.
- Operator ID if you are responsible for a drone with a camera, which covers most aerial imaging setups.
- Visual line of sight at all times. Your phone screen does not count as seeing the drone.
- Distance limits that change by category, including 50m rules for some flights and 30m or 5m in A2 with the right class mark and low-speed mode.
- Landowner or site permission for takeoff and landing.
- Insurance if the flight is for work, paid photography, or any other non-hobby use.
- Night flying only with a green flashing light turned on.
If I need to work closer to people with a suitable drone, I factor the A2 Certificate of Competency into the plan early, because that can change both the route and the location. I also treat Remote ID as a real buying feature now: some UK class-marked aircraft need it from 1 January 2026, and it becomes universal in 2028. The CAA also treats paid photography or video as commercial flying, so third-party insurance is required. Once those basics are in place, the real creative work starts with the shot list.
The shot types that usually give the best return
I am deliberately conservative with drone motion, because one strong idea usually beats four half-interesting ones. A clean reveal or a steady lateral move is often enough. The point is not to make the drone look clever; it is to make the subject look clear.
- The reveal starts tight or low and slowly opens the scene. It is the easiest way to show scale without feeling flashy.
- The orbit works when the subject has a clear centre, such as a house, tower, or vehicle. A slow orbit creates parallax, the shift in background perspective that gives the frame depth, but only if it stays smooth.
- The top-down frame is useful for maps, rooflines, fields, shorelines, and layout-heavy scenes. It turns messy ground detail into structure.
- The tracking shot follows a subject like a car, cyclist, or boat. I use it when motion is part of the story, not just decoration.
- The static hover is underrated. Sometimes the environment does the work: waves, cloud shadows, traffic, or moving light can carry the frame.
I try not to treat every flight like a demo reel. If the subject is strong, simple motion usually wins. Once the shot list makes sense, camera setup decides whether the footage looks polished or disposable.
How I set up the camera for cleaner stills and smoother video
The fastest way to improve aerial images is to stop letting the drone guess. For stills, I shoot RAW whenever I can, keep ISO as low as practical, and bracket exposures when the sky is much brighter than the ground. For video, I prefer a frame rate that matches the delivery target, then set shutter speed to preserve natural motion blur.
| Goal | Starting point | Why it helps |
|---|---|---|
| Still photos | RAW, low ISO, exposure bracketing if needed | More room to recover shadow detail and highlights |
| Video | 25fps or 50fps, shutter around 1/50 or 1/100, ND filter in bright light | Cleaner motion without blown-out skies |
| Colour | Flat or log profile if you plan to grade | More latitude in post-production |
Dynamic range, the spread between the brightest highlights and darkest shadows a camera can hold, matters more than headline megapixels when the scene has bright sky and dark ground in the same frame. A neutral-density filter is basically sunglasses for the lens, and it matters more than most beginners think on a bright day. I also lock white balance when the lighting is stable, because auto white balance can shift from shot to shot and make a sequence feel uneven. A gimbal, which is the stabilised camera mount, should be doing most of the work; if the horizon is drifting or the drone is fighting the wind, I change the plan instead of trying to rescue bad motion later. When the camera is set correctly, editing becomes about refinement rather than damage control.
Why editing and secure delivery matter just as much
Editing drone footage is mostly about restraint. I straighten the horizon, trim clips earlier than most beginners do, correct colour gently, and avoid over-sharpening the edges until the image starts to ring. If the footage is for a client, I also think about delivery format: 4K masters for reuse, compressed exports for web, and a clean archive of the originals in case the project grows later.
- Back up immediately. Keep a second copy of raw cards or downloads before you format anything.
- Use consistent filenames. A sequence you can find later is worth more than a prettier folder name.
- Handle private content carefully. If the drone captured gardens, windows, or identifiable people, I check whether that material is actually needed before keeping or sharing it.
- Keep a delivery version and an archive version. Social cuts and master files solve different problems.
This is the part of drone work that feels less cinematic, but it protects the value of everything you shot. Once the files are handled properly, the last job is knowing when the problem is not skill, but scope.
What I would lock in before the next flight
What I would lock in before the next flight is simple: confirm the legal status of the aircraft, choose the shot that serves the subject, and leave enough battery to come back with margin. The common mistakes are predictable: flying too close to people, ignoring gusts, trying to salvage bad weather, or taking on work that really belongs in a more advanced category.
- Use the drone for what it is good at. Scale, motion, and geography are its strengths.
- Respect the distance rules. A shot is not worth a breach of privacy or a risky approach.
- Plan for the return, not just the takeoff. A 10-minute usable flight is better than a 20-minute gamble.
- Bring in a specialist when the job gets complex. Night work, crowded sites, or anything near busy infrastructure deserves more than a casual pilot.
If you treat aerial imaging as a mix of camera craft, airspace discipline, and secure handling, the results improve quickly. That is the standard I would use for any serious drone project in the UK.